
A Gold Coast bathroom has to do two jobs at once: look like a retreat and survive the daily grind of humidity, salt air, sunscreen residue, wet towels, and the kind of sun that bleaches anything cheap. You’re not just renovating a room. You’re building a little micro-climate that won’t rot from the inside out.
One detail will end up defining the whole space.
You just don’t know which one yet.
Start with the feeling, not the fixtures
People get this backwards all the time. They fall in love with a tapware finish on Instagram, then wonder why the room feels awkward and cramped once it’s built.
Instead, decide what the bathroom is for in your life. Calm-down zone? Fast, no-fuss mornings? A “shower like a resort” vibe? Once the emotional brief is clear, the practical choices get easier: lighting layers, storage volume, mirror size, whether the vanity needs drawers (it does), and where you can tolerate visual noise.
In my experience—something echoed by Kuda Bathrooms & Renovations—the most successful renovations aren’t the fanciest, they’re the ones where the daily routine flows without friction: entry → towel drop → vanity → shower → exit. If you have to sidestep the door to reach the basin, you’ll hate it within a month.
Hot take: waterproofing and ventilation matter more than tiles.
A glossy tile selection won’t save a bathroom with poor exhaust, sloppy seals, or cabinetry that swells the first summer it meets coastal humidity. If you’re on the Gold Coast, you’re playing on hard mode: moisture swings, salty air near openings, and serious UV through windows.
So yes, pick pretty finishes. But lock down the invisible systems first.
What “coastal-ready” actually means (specialist hat on)
– Moisture-rated substrate behind wet areas (wet-area plasterboard or cement sheet where required)
– Correctly detailed waterproofing membrane with compliant coverage and cure times
– Mechanical extraction sized for the room, ducted to outside (not into roof space)
– Corrosion-resistant fixings and fittings where salty air can reach them
– UV-stable finishes on anything exposed to strong sunlight
Now, this won’t apply to everyone, but if your bathroom has a window that’s regularly left open and you’re within a few kilometres of the ocean, I’d treat “salt exposure” as a real spec requirement, not a maybe.
Budget + timeline: be honest, then add a buffer
Here’s the thing: bathroom renovations feel simple until you start pulling them apart. Then you discover the “small” job includes plumbing adjustments, electrical compliance, wall repairs, waterproofing inspections, tile lead times, and a dozen little decisions that cost money if you delay them.
A realistic budget plan isn’t just “tiles + vanity + labour.” It’s also:
– demolition and waste removal
– waterproofing + certification/inspection (where applicable)
– plumbing rough-in and fit-off
– electrical rough-in and fit-off
– tiling labour (often separate from waterproofing)
– tapware, accessories, mirrors, shower screens
– paint, trim, doors, hardware
– contingency for surprises
Contingency: 10, 15% is the usual range I’m comfortable recommending for bathrooms, because walls hide sins.
Timeline-wise, you need slack for deliveries and trade scheduling. Coastal builds can be particularly sensitive to weather windows if you’re waiting on external venting work or dealing with older homes that reveal problems late.
The Gold Coast climate problem (humidity + sun)
Humidity: the quiet wrecking ball
Humidity doesn’t just fog mirrors. It creeps into cabinetry edges, silicone joins, plaster, and paint films. Over time, you see it as swelling, peeling, and that musty smell that never quite leaves.
Good strategy looks boring on paper:
– sealed edges on vanities and panels
– mould-resistant silicone in wet zones (and applied correctly, tooling matters)
– grout and sealers designed for wet areas
– exhaust fan with timer or humidity sensor
– fewer horizontal ledges where water can sit
If you’re relying on “we’ll just open the window,” you’re gambling. Rainy weeks happen.
Sun: glare, fading, and heat
Bathrooms with big glazing can look incredible… right up until the mirror becomes a spotlight at 7am and every glossy surface screams back at you.
Anti-glare choices that don’t ruin the vibe:
– diffused/frosted glass or a film
– matte or satin finishes on cabinetry and walls
– warm, dimmable lighting that can compete with daylight
– blinds that actually suit wet areas (not fabric that moulds)
And yes, UV can fade finishes. Pick materials that tolerate it, especially if direct sun hits a vanity panel or niche area daily.
One useful number: Australia has some of the highest UV levels globally, and the Bureau of Meteorology regularly records “Extreme” UV Index readings in many regions during summer (source: Australian Government Bureau of Meteorology, UV Index guidance and reporting).
Materials: pick the ones that won’t punish you later
Trends are fun. Replacing swollen cabinetry isn’t.
Floors and walls
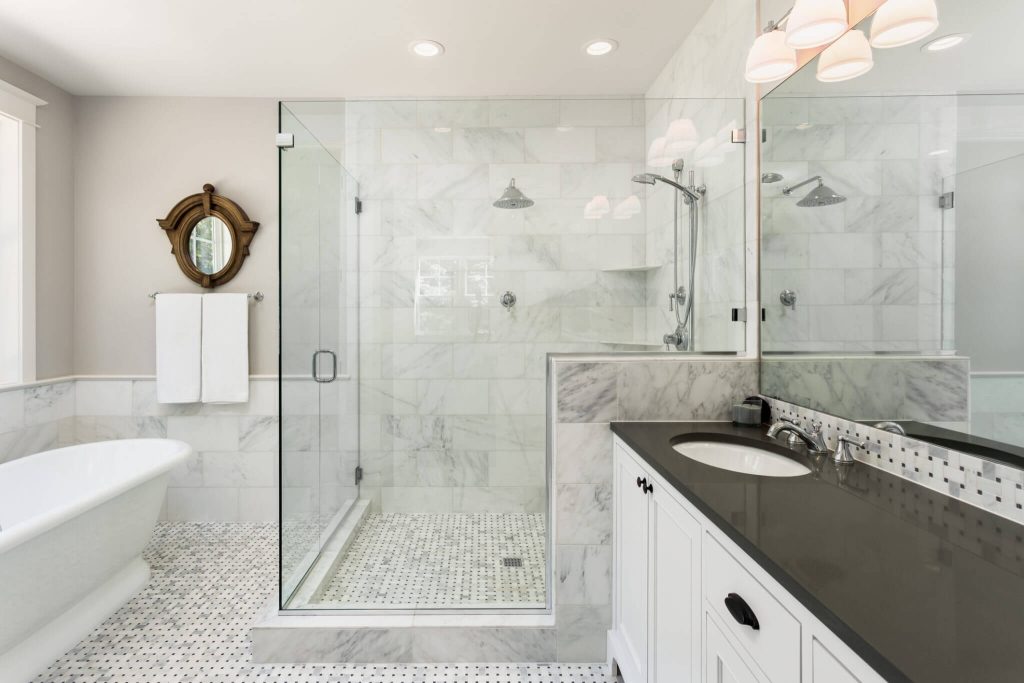
Porcelain is the workhorse for coastal bathrooms: dense, hard-wearing, low-porosity. Ceramic can work too, but porcelain tends to be the safer bet when you want durability plus low maintenance. Go for a finish that won’t turn into an ice rink when wet, textured, slip-rated options exist that still look high-end.
Grout is where many “luxury” bathrooms start failing aesthetically. Choose it like you mean it. Consider a darker tone if you don’t want to spend your life scrubbing.
Vanities and cabinetry
Moisture-resistant boards and well-sealed edges make a bigger difference than most people expect. I’m also a fan of wall-hung vanities in smaller rooms: they visually open the space and make cleaning less annoying (practical luxury).
Benchtops
Engineered stone (like quartz) is popular because it’s consistent, stain resistant, and doesn’t demand much. Natural stone can be stunning but asks more of you: sealing, careful cleaning, and acceptance that it might patina.
Layout: small bathrooms can feel expensive (if you plan them properly)
You don’t need a bigger footprint. You need fewer layout mistakes.
Keep sightlines clean. Reduce door conflicts. Make storage intentional rather than accidental. Recessed niches in showers are a classic move because they remove clutter from corners and ledges, just detail the waterproofing properly.
A compact bathroom that works usually has:
– a vanity with drawers (not a hollow cupboard you’ll hate)
– a shower screen that doesn’t chop the room into fragments
– towel storage that’s reachable without walking dripping-wet across the room
– lighting that’s usable at night, not just pretty in photos
One-line truth: If your storage is bad, your bathroom will always look messy.
Ventilation: treat it like a system, not a fan
Look, a cheap fan that’s never used is basically decor.
If you want a bathroom that stays fresh, you need consistent air exchange. Humidity-sensing fans are worth it in busy households. Timers are the next best option. Duct it outside, keep the run efficient, and avoid weird dead zones where moisture lingers.
I’ve seen beautiful bathrooms wrecked by persistent condensation, black mould in corners, swollen architraves, peeling paint. Ventilation is what prevents that slow decline.
Trades and sourcing: local knowledge beats generic promises
Gold Coast renovations go smoother when your trades understand local housing stock and coastal conditions. Ask to see recent work, not a portfolio from five years ago. Verify licenses and insurance. Get itemised quotes.
Two or three strong candidates per trade is ideal. Any fewer and you lose leverage; any more and you waste your own time.
When you’re sourcing materials, local availability matters more than people admit. A “perfect” tile with a six-week delay can blow up sequencing, and sequencing is what keeps labour costs from spiralling.
Fixtures, fittings, and storage that make sense near the coast
For finishes, think corrosion resistance and cleanability. Brushed nickel, stainless, and quality matte blacks can all work, what matters is the grade and the coating quality, not the colour.
I’d prioritise:
– water-efficient showerheads that still feel generous
– tapware with solid internals (cheap cartridges fail fast)
– shower shelves/niches instead of dangling caddies
– recessed mirrored cabinets for stealth storage
– hardware that matches (mixed metals can work, but do it deliberately)
And don’t forget the boring bits: sealed joins, moisture-rated cabinetry, and vented backs where appropriate. Pretty hardware on swollen doors is just tragedy with better styling.
A phased timeline that doesn’t collapse halfway through
Renovations run well when the sequence is respected. Not rushed. Not rearranged because someone’s tile shipment is late.
Typical phases (with real-world dependencies):
- Scope lock + selections early (tiles, tapware, vanity sizes, lighting positions)
- Demolition + disposal
- Framing and substrate prep
- Plumbing rough-in / electrical rough-in
- Waterproofing + cure time + inspection (where required)
- Tiling
- Fit-off: plumbing fixtures, electrical, mirrors, accessories
- Screens, finishing, silicone, final checks
Eco-friendly choices can slot in without drama: low-VOC paints, efficient lighting, low-flow fixtures, recyclable materials. Just specify them early so nobody substitutes something random at the last minute.
Common pitfalls (Gold Coast edition)
Some are universal. Some feel very coastal.
– Scope creep: “While we’re at it…” is where budgets go to die.
– Under-ventilating: you’ll pay for it in mould, smell, and maintenance.
– Cheap waterproofing shortcuts: not immediately visible, brutally expensive later.
– Ordering late: one delayed item can idle multiple trades.
– Over-glossing everything: glare city, plus every water spot shows.
If you’re disciplined about decisions early, the whole job gets calmer. Less rework. Less stress. Better outcome.
And that “one defining detail” you were wondering about? Sometimes it’s the hero tile. Sometimes it’s the way the light hits a matte wall at dusk. More often than people like to hear, it’s the fact that the room still looks brand new two summers from now.